*This post contains affiliate links. If you make a purchase following an affiliate link, I’ll receive a small commission.
This post includes:
◉ FREE Pattern: The entire written pattern for FREE.
The ad-free PDF contains an easy-to-follow crochet chart!Available at mandobug.com and on Ravelry.
◉ Video Tutorial: Helpful video tutorial goes over special stitches used in this pattern.
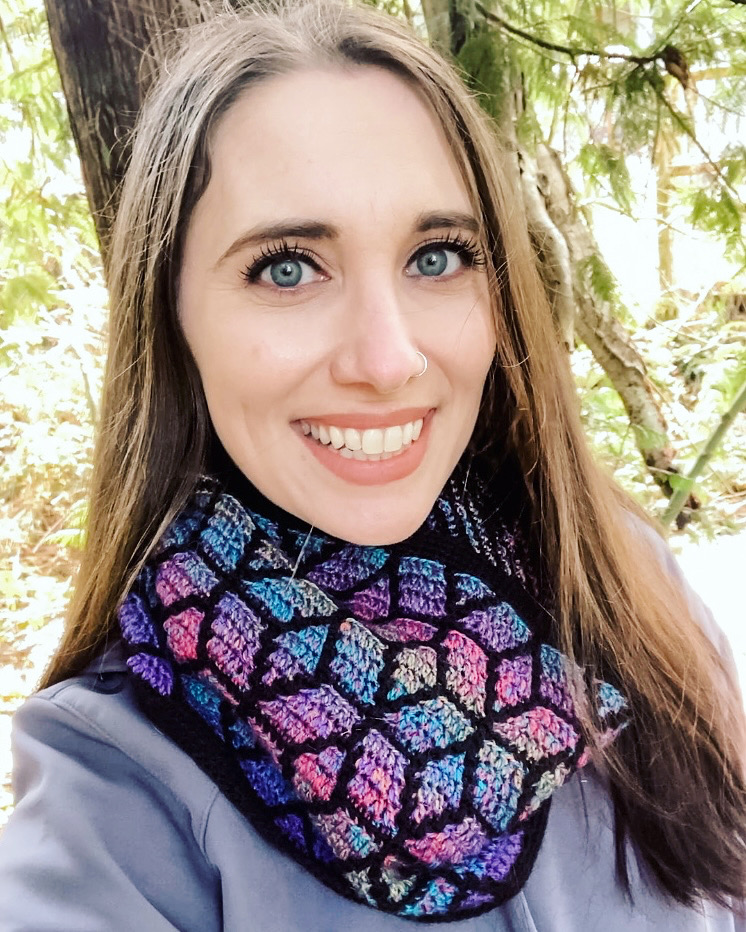
The Skyshard Mosaic Cowl is an intermediate pattern that uses the overlay mosaic crochet technique. Each row is worked using a single color. Strategically placed single crochets and double crochets create this stunning stained glass crystal design.
Find a printer-friendly, PDF version of the Skyshard Mosaic Cowl at mandobug.com and on Ravelry.
The Cowl’sConstruction
Worked from the bottom up the Skyshard Mosaic Cowl starts with a few rows of single crochet in the back loop only using the contrast color. The body of the cowl is worked using an overlay mosaic crochet technique. Each row is worked using a single color. You will either be placing a single crochet in the back loop only or placing a double crochet in the front loop of the row below. When working in the front loop of the row below, skip the corresponding stitches in the current row unless stated otherwise.
Choosing the Right Yarn
This project includes instructions for using two different colors of either a category 1 super fine fingering weight yarnOR a category 4 medium worsted weight yarn.
For my fingering weight sample, I used Hobbii Dream Colour,a gradient color-changing blend of superwash merino and nylon, and Hobbii Evergreen, an organic wool solid colored yarn. But if wool is not for you, that’s no problem! This pattern works well in acrylic and cotton yarns as well!
For my worsted weight sample, I usedHobbii Lollipop Melange, a marled striping wool acrylic blend, and Hobbii Amigo XL a soft acrylic solid colored yarn.
What color should I choose? For this pattern, I highly recommend using contrasting colors. I really like the look of an ombre, gradient, variegated, speckled, or self-striping yarn for the main color and a solid color for the contrast color. You’ll want to choose a contrast color that does not match any of the shades of the main colored yarn to avoid distorting the patterns image. Two solid colored contrasting colors would also be a great choice.
Is there a yarn you would avoid? The only yarns I would avoid for this pattern are yarns that have a fuzzy halo or have an inconsistent thickness. These types of yarn have a lot of natural texture that may distort the appearance of the colorwork design.
Skyshard Mosaic Cowl Details
Skill Level
Intermediate (uses basic stitches with complex shaping)
437 yds (400 m) / 3.5 oz (100 g) (shown in color 11 as main color)
1 ball Hobbii Evergreen, 100% Organic Wool, 251 yds (230 m) / 1.75 oz (50 g) (shown in color 08 as contrast color)
Worsted Weight Version
1 cake Hobbii Lollipop Melange, 30% Superwash Wool, 70% Acrylic, 382 yds (350 m) / 7 oz (200 g) (shown in color 08 as main color)
2 skeins Hobbii Amigo XL, 100% Acrylic, 109 yds (100 m) / 1.75 oz (50 g) (shown in color 11 as main color)
*Contains affiliate links. If you make a purchase following a link, I’ll receive a small commission.
Hook
Fingering weight version
US size D hook (3.25 mm) or size needed to obtain gauge.
Worsted weight version
US size H hook (5 mm) or size needed to obtain gauge.
Notions
Tapestry needle for weaving in ends.
Finished Measurements
Fingering weight version
Circumference – 26” (66 cm)
Length – 9.25” (23.5 cm)
Worsted weight version
Circumference – 26.25” (66.5 cm)
Length – 11” (28 cm)
Gauge
Fingering weight version
18 stitches = 3.25” (8.3 cm)
16 rows = 2.75” (7 cm)
in stitch pattern.
Worsted weight version
18 stitches = 5.25” (13.5 cm)
16 rows = 4.5” (11.5 cm)
in stitch pattern.
Abbreviations
blo – back loop only
CC – contrast color
CD* – centered double crochet decrease
ch – chain
DD* – diagonal down
dc– double crochet
DU* – diagonal up
flo – front loop only
MC – main color
sk – skip
st(s) – stitch(es)
* see Special Stitches
Special Stitches
Need help with the special stitches?
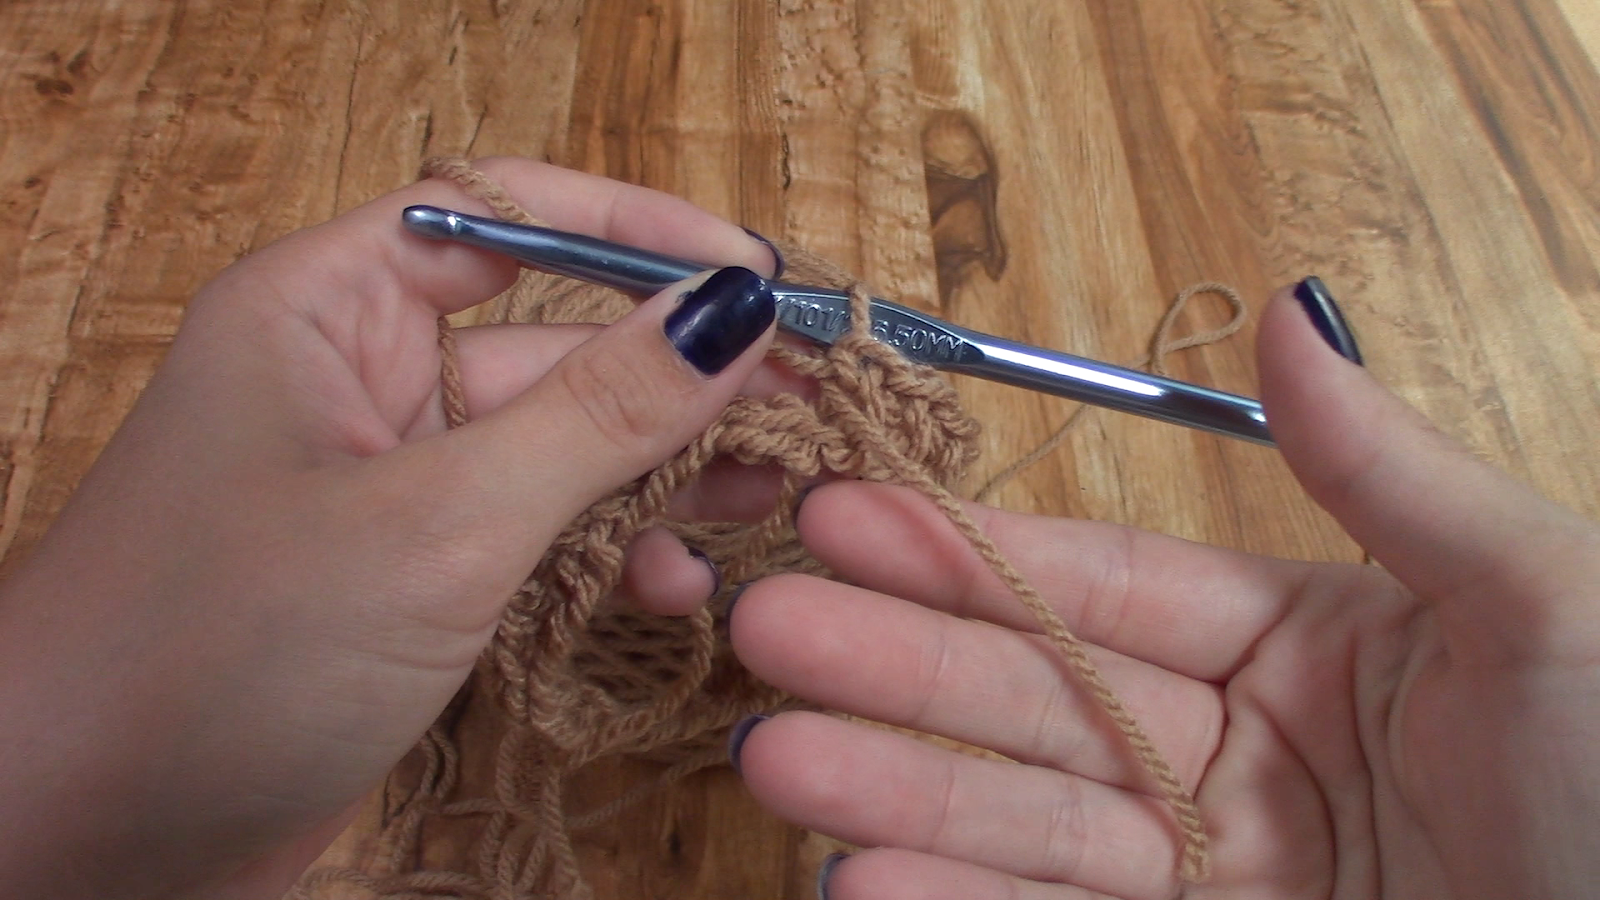
Diagonal Up (DU)
Worked over two stitches.
Sc in blo of indicated st, dc in flo in row directly below sc just made, sk next st.
Diagonal Down (DD)
Worked over two stitches.
Sk first indicated st, dc in flo in next st 1 row below, sc in blo in row directly above dc just made.
Centered Double Crochet Decrease (CD)
Worked over three stitches.
Sc in first indicated st, yarn over, insert hook into front loop in row directly below sc just made, yarn over and pull up a loop, yarn over and pull through 2 loops, sk next st, yarn over, insert hook into front loop of next st 1 row below, yarn over and pull up a loop, yarn over and pull through 2 loops, yarn over and pull through all 3 loops on hook, sc in blo of st in row directly above front loop just worked in.
Find a printer-friendly, charted PDF version of the Skyshard Mosaic Cowl at mandobug.com and on Ravelry.
Skyshard Mosaic CowlFree Crochet Pattern
Worked from the bottom up the Skyshard Mosaic Cowl starts with a few rows of single crochet in the back loop only using the contrast color. The body of the cowl is worked using an overlay mosaic crochet technique. Each row is worked using a single color. You will either be placing a single crochet in the back loop only or placing a double crochet in the front loop of the row below. When working in the front loop of the row below, skip the corresponding stitches in the current row unless stated otherwise.
Notes
Pattern is written using US crochet terminology.
Pattern is written and charted. Charted instructions start on page 8.
Pattern is written for fingering weight with worsted weight version in parentheses. Ex: Ch 144 (90)
Pattern repeats are placed within brackets and braces.
When working in the front loop of the row below, skip the corresponding stitches of the current row unless stated otherwise.
When changing colors, join the new color by completing the final pull-through of the previous stitch using the new color.
Pattern is worked continuously in the round, do not sl st to join.
Bottom Border
If you wish to adjust the circumference of the cowl, add or subtract 18 stitches from the beginning chain. This will adjust your circumference by 3.25” (8.3 cm) for the fingering weight version and by 5.25” (13.5 cm) for the worsted weight version. Please note that it will also affect yarn requirements.
Using CC, chain 144 (90).
Round 1: Being careful not to twist the chain, join to work in the round by placing a sc in the first chain. Sc in each ch around.
(144 sc (90 sc))
Rounds 2-4: sc in blo around.
Drop CC. Carry CC up on the wrong side here and throughout the body of the cowl.
Body
When starting the body work Setup Round 1. This creates a clean border. This is the only time you will work that round and when you do, skip Repeating Round 1 and continue with Round 2.
Join MC,
Setup Round 1: sc in blo around.
Using MC,
Repeating Round 1: [sc in blo in next 2 sts, dc in flo 1 row below in next 5 sts, sc in blo in next 11 sts] repeat around.
Drop MC. Carry MC up on the wrong side here and throughout the body of the cowl.
Using CC,
Round 2: [sc in blo in next st, DU over next 2 sts, sc in blo in next 3 sts, DD over next 2 sts, sc in blo of next 5 sts, dc in flo 1 row below in next st, sc in blo in next 4 sts] repeat around.
Using MC,
Round 3: [dc in flo 1 row below in next 2 sts, sc in blo in next st, dc in flo 1 row below in next 3 sts, sc in blo in next st, dc in flo 1 row below in next 4 sts, DD over next 2 sts, sc in blo of next st, DU over next 2 sts, dc in flo 1 row below in next 2 sts] repeat around.
Using CC,
Round 4: [sc in blo in next 2 sts, DU over next 2 sts, sc in blo of next st, DD over next 2 sts, sc in blo in next 5 sts, dc in flo 1 row below in next st, sc in blo in next st, dc in flo 1 row below in next st, sc in blo in next 3 sts] repeat around.
Using MC,
Round 5: [dc in flo 1 row below in next 3 sts, sc in blo in next st, dc in flo 1 row below in next st, sc in blo in next st, dc in flo 1 row below in next 4 sts, DD over next 2 sts, sc in blo in next st, dc in flo 1 row below in next st, sc in blo in next st, DU over next 2 sts, dc in flo 1 row below in next st] repeat around.
Using CC,
Round 6: [sc in blo in next 3 sts, CD over next 3 sts, sc in blo in next 5 sts, dc in flo 1 row below in next st, sc in blo in next 3 sts, dc in flo 1 row below in next st, sc in blo in next 2 sts] repeat around.
Using MC,
Round 7: [dc in flo 1 row below in next 4 sts, sc in blo in next st, dc in flo 1 row below in next 4 sts, DD over next 2 sts, sc in blo in next st, dc in flo 1 row below in next 3 sts, sc in blo in next st, DU over next 2 sts] repeat around.
Using CC,
Round 8: [sc in blo in next 4 sts, dc in flo 1 row below in next st, sc in blo in next 5 sts, dc in flo 1 row below in next st, sc in blo in next 5 sts, dc in flo 1 row below in next st, sc in blo in next st] repeat around.
Using MC,
Round 9: [sc in blo in next 11 sts, dc in flo 1 row below in next 5 sts, sc in blo in next 2 sts] repeat around.
Using CC,
Round 10: [sc in blo in next 4 sts, dc in flo 1 row below in next st, sc in blo in next 5 sts, DU over next 2 sts, sc in blo in next 3 sts, DD over next 2 sts, sc in blo in next st] repeat around.
Using MC,
Round 11: [dc in flo 1 row below in next 2 sts, DD over next 2 sts, sc in blo in next st, DU over next 2 sts, dc in flo 1 row below in next 4 sts, sc in blo in next st, dc in flo 1 row below in next 3 sts, sc in blo in next st, dc in flo 1 row below in next 2 sts] repeat around.
Using CC,
Round 12: [sc in blo in next 3 sts, dc in flo 1 row below in next st, sc in blo in next st, dc in flo 1 row below in next st, sc in blo in next 5 sts, DU over next 2 sts, sc in blo in next st, DD over next 2 sts, sc in blo in next 2 sts] repeat around.
Using MC,
Round 13: [dc in flo 1 row below in next st, DD over next 2 sts, sc in blo in next st, dc in flo 1 row below in next st, sc in blo in next st, DU over next 2 sts, dc in flo 1 row below in next 4 sts, sc in blo in next st, dc in flo 1 row below in next st, sc in blo in next st, dc in flo 1 row below in next 3 sts] repeat around.
Using CC,
Round 14: [sc in blo in next 2 sts, dc in flo 1 row below in next st, sc in blo in next 3 sts, dc in flo 1 row below in next st, sc in blo in next 5 sts, CD over next 3 sts, sc in blo in next 3 sts] repeat around.
Using MC,
Round 15: [DD over next 2 sts, sc in blo in next st, dc in flo 1 row below in next 3 sts, sc in blo in next st, DU over next 2 sts, dc in flo 1 row below in next 4 sts, sc in blo in next st, dc in flo 1 row below in next 4 sts] repeat around.
Using CC,
Round 16: [sc in blo in next st, {dc in flo 1 row below in next st, sc in blo in next 5 sts} twice, dc in flo 1 row below in next st, sc in blo in next 4 sts] repeat around.
A crochet along (CAL) is an event where a group of people crochets the same project (or type of project) during a specific time period.
When is the CAL?
The CAL will run from March 7th – 31st, 2022. The pattern will be available as a free download for the duration of the CAL.
How do I participate?
The CAL chat will be hosted in the Mandobug Crafters Corner Facebook Group. That is where you can ask questions, share your progress by posting pictures, and see other participants’ projects. The group is private so you will need to request to join and answer a few questions; this is not to be exclusive but to filter bots and spam accounts out of the group. You can also share your pictures or videos on any social media by using #skyshardcal . Using this hashtag on your posts allows people to see your progress when they follow or search for the hashtag. You can also search for and follow this hashtag to see the progress of others.
What color should I choose?
I highly recommend using contrasting colors for this pattern. I really like the look of an ombre, gradient, variegated, speckled, or self striping yarn for the main color and a solid color for the contrast color being careful to choose a contrast color that does not match any of the shades of the main colored yarn. Two solid colored contrasting colors would also be a great choice.
Is there a yarn you would avoid?
The only yarns I would avoid for this pattern are yarns that have a fuzzy halo or have an inconsistent thickness. These types of yarn have a lot of natural texture that may distort the appearance of the colorwork design.
Are you in!?
Let me and others know you’ve joined by sharing a picture of your gathered materials or your gauge swatch in the Mandobug Crafters Corner Facebook Group or by using #skyshardcal on any other social media platform. I’ve seen a few people share their yarn choices already!
Pattern Details
Description
The Skyshard Mosaic Cowl is an intermediate pattern that uses the overlay mosaic crochet technique. Each row is worked using a single color. Strategically placed single crochets and double crochets create this stunning stained glass crystal design. The cowl is worked seamlessly from the bottom up. Instructions are both written and charted and include detailed information on how to customize the cowl’s circumference and length. Both a fingering weight and a worsted weight version are included in this pattern.
Skill Level
Intermediate (uses basic stitches with complex shaping)
Finished Measurements
Fingering weight version
Circumference – 26” (66 cm)
Length – 9.25” (23.5 cm)
Worsted weight version
Circumference – 26.25” (66.5 cm)
Length – 11” (28 cm)
What are the Required Materials?
Yarn Requirements
Fingering Weight Version
Main Color (MC) – 225 yds / 206 m
Contrast Color (CC) – 225 yds / 206 m
Worsted Weight Version
Main Color (MC) – 180 yds / 165 m
Contrast Color (CC) – 180 yds / 165 m
Suggested Yarns*
*Contains affiliate links. If you make a purchase following a link, I’ll receive a small commission.
◉ FREE Pattern: The entire written pattern for FREE.
◉ Video Tutorial: A helpful video tutorial going over a specific color carrying technique needed for this pattern.
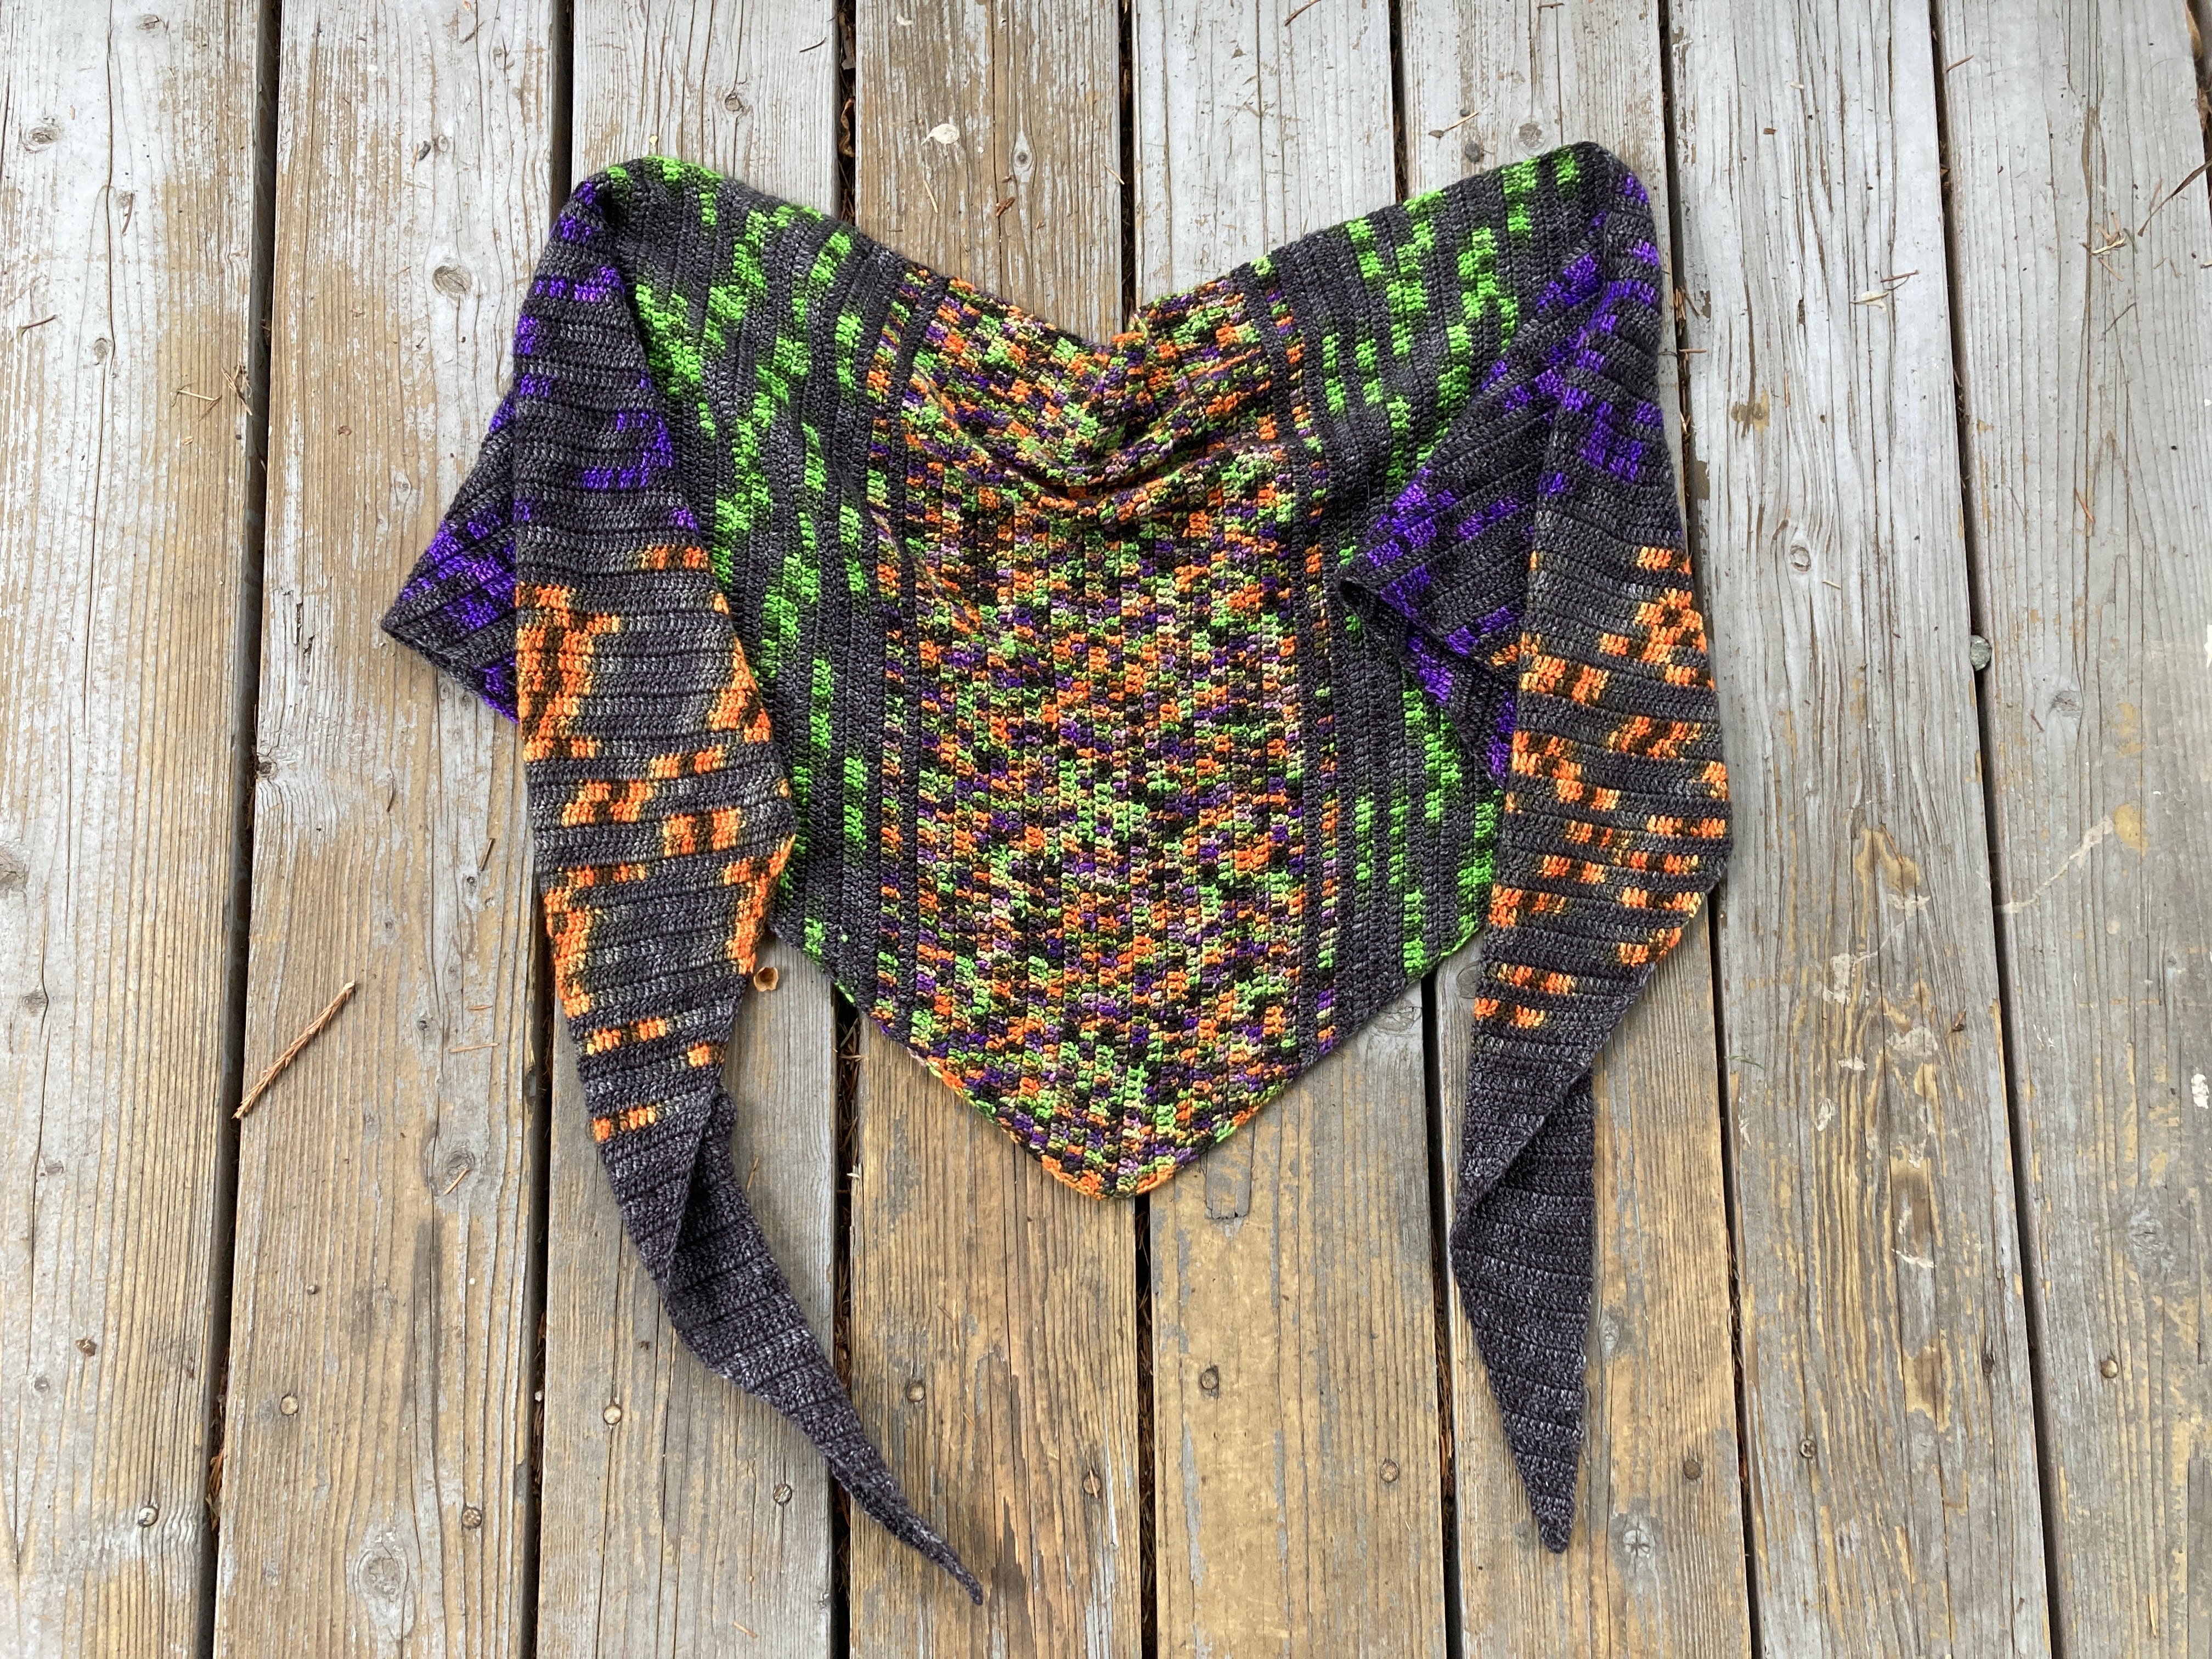
The 550 Striped Shawl is a beginner-friendly shawl designed to use one set of 5, 50g hanks of fingering weight yarn. Worked from side to side, this shallow triangle-shaped shawl features five different colors striped in large blocks with smaller stripes in between. This pattern is great for using 50g skeins, advents, and minis. The PDF download even includes a coloring chart to plan out your colors!
Find a printer-friendly, PDF version that includes a coloring chart at mandobug.com and on Ravelry.
The Shawl’sConstruction
The 550 Striped Shawl is worked in flat rows from left to right. Starting at one end the shawl is increased slowly to its full width. After working two plain rows, the shawl is decreased back down to complete the other half of the shawl. With thin, single row stripes worked in between colors blocks, this pattern uses a technique for carrying colors up the rows to minimize weaving in extra ends. This does require you to work some rows without turning your work. This technique is demonstrated in the How to Carry Colors for Single Row Stripes Video Tutorial.
Choosing the Right YarnBase
This project uses a category 1 super fine fingering weight superwash merino nylon blend. I used a 50g skein set from Mace of Skeins. The set I used was part of her 2021 Halloween box set. If you’ve never experienced the magic that is Mace of Skeins I highly recommend you check out her amazing collection of hand dyed yarns at maceofskeins.com.
The Mace of Skeins Halloween box set I purchased used Mace of Skeins Club which is an 80% Superwash Merino, 20% Nylon 400 yds / 100 g yarn. When substituting yarns, it’s best to look for similar fiber content as well as similar weight and yardage. That being said, if this base is not right for you that’s no problem! Accessory projects like this one can be really flexible when it comes to yarn substitution.
This shawl will still be enjoyable in other fiber contents such as cotton, acrylic, and other blends. Howevery, I do recommend paying special attention to the yarns yardage and recommended hook size. You’ll need to make sure you purchase at lease 200 yds of each color and you’ll want the recommended hook size to include a 3.5mm hook. If the yarn you choose calls for a larger hook, your shawl will end up larger than the patterns finished dimensions which may be too large for your liking.
Choosing the Right YarnColors
The Mace of SkeinsHalloween box set came with 50g each of the following colors:
A – Shadow Cat B – Jack-O-Lantern C – Witchy Business D – Cat Eye E – Monster Mash
This color set completely inspired the design because Color A – Shadow Cat, a shadowy shade of black, was also the primary color in colors B – Jack-O-Lantern, C – Witchy Business, & D – Cat Eye. That is what prompted me to stripe Color A throughout the entire shawl. When choosing colors for your shawl, I recommend finding a shade you want running through the entire shawl for Color A and choosing remaining colors that include shades from Color A if possible.
Want to use scraps, minis, or advent yarn instead?
Each large “color block” space takes 25 grams of yarn or less with the exception of the middle space which uses 50 grams. Each single row stripe takes approximately 1 – 4 grams of yarn, depending on how wide the shawl is at that point. If you’re working with 20 gram minis you can remove two rows from each color block section (note this will throw your total stitch count off but will not be a problem if you continue following the shape of the pattern). If you want to mirror colors with 20 gram minis, you can use two mini’s per color block section. Now’s the time to get creative and have fun!
550 Striped Shawl Details
Skill Level Beginner (uses basic stitches with simple shaping)
Yarn Requirements Fingering Weight Yarn (#1 Super Fine) Color A – 200 yds (183 m) Color B – 200 yds (183 m) Color C – 200 yds (183 m) Color D – 200 yds (183 m) Color E – 200 yds (183 m)
Suggested Yarn Mace of Skeins 5 50g Skein Set, 80% Superwash Merino, 20% Nylon, 1,000 yds (914 m), 8.8 oz (250 g)
Shown in colors: A – Shadow Cat B – Jack-O-Lantern C – Witchy Business D – Cat Eye E – Monster Mash
Hook US size E-4 (3.5 mm) hook or size needed to obtain gauge.
Notions Removable stitch marker (optional for marking the increase/decrease side of the shawl)
Finished Measurements
A – Length 83” (211 cm)
B – Width 15.5” (39.5 cm)
Gauge 27 stitches, 10 rows = 4” in double crochet, after blocking.
Abbreviations ch – chain dc– double crochet dc2tog – double crochet two together dc3tog – double crochet three together RS – right side WS – wrong side
Special Stitches
Double Crochet Two Together(dc2tog) [Yarn over, insert hook in next stitch, yarn over and pull up loop, yarn over and draw through two loops] twice, yarn over and draw through all 3 loops on hook.
Double Crochet Three Together(dc3tog) [Yarn over, insert hook in next stitch, yarn over and pull up loop, yarn over and draw through two loops] three times, yarn over and draw through all 4 loops on hook.
550 Striped Shawl Free Crochet Pattern
Designed to use one 5 skein set of 50g fingering weight yarn, the 550 Striped Shawl features five different colors in a shallow triangle shape. Stripes are worked in between color blocks for visual interest. Increases are made along one side of the shawl to reach its full width. After two plain rows, decreases are made along the same side of the shawl to complete its full shape.
Find a printer-friendly, PDF version that includes a coloring chart at mandobug.com and on Ravelry.
Notes ● Pattern is written using US crochet terminology. ● Use a removable stitch marker to mark the increasing and decreasing side of the shawl. ● Ch-1 at the beginning of the row does not count as a stitch. ● To minimize weaving in ends, colors are carried up the edges of rows while working two wrong side rows or two right side rows at times. ● When changing colors, join the new color by completing the final pull through of the previous stitch using the new color.
Increase Side
Color A Block
Using Color A make a magic ring, Row 1 (WS): ch 1, does not count as a stitch here and throughout, 3 dc in magic ring, turn. (3 dc) Row 2 (RS): ch 1, 2 dc in first dc, dc across, turn. (4 dc)
Row 3 (WS): ch 1, dc to last dc, 2 dc in last dc, turn. (5 dc) Rows 4 – 24: Repeat rows 2 and 3 ending after a row 2 repeat. (26 dc) Drop Color A. Do not fasten off Color A, you will carry up the yarn for future rows.
Need help carrying up colors for single striped rows?
Join Color B, Row 25 (WS): ch 1, dc to last dc, 2 dc in last dc, do not turn. (27 dc) Drop Color B.
You may want to put a stitch marker in the live loop of Color B to keep it from unraveling. You will now work another wrong side row.
Return to the beginning of the row just completed. Using Color A, pull up a loop in the first stitch of the last row, Row 26 (WS): ch 1, dc to last dc, 2 dc in last dc, turn. (28 dc) Drop Color A.
Switch to Color B using its live loop, Row 27 (RS): ch 1, 2 dc in first dc, dc across, do not turn. (29 dc) Drop Color B.
You will now work another right side row. Return to the beginning of the row just completed.
Using Color A, pull up a loop in the first stitch of the last row, Row 28 (RS): ch 1, 2 dc in first dc, dc across, turn. (30 dc) Rows 29 and 30 (WS): Repeat rows 25 and 26. (32 dc)
All repeats include their color changes here and throughout. Fasten off Color A.
Color B Block Using Color B, Row 31 (RS): ch 1, 2 dc in first dc, dc across, turn. (33 dc) Row 32 (WS): ch 1, dc to last dc, 2 dc in last dc, turn. (34 dc) Rows 33 – 52: Repeat rows 31 and 32. (54 dc) Drop Color B.
Color B to C Stripes Join Color A, Row 53 (RS): ch 1, 2 dc in first dc, dc across, do not turn. (55 dc) Drop Color A.
You will now work another right side row.Return to the beginning of the row just completed. Using Color B, Row 54 (RS): ch 1, 2 dc in first dc, dc across, turn. (56 dc) Fasten off Color B.
Using Color A, Row 55 (WS): ch 1, dc to last dc, 2 dc in last dc, turn. (57 dc) Drop Color A.
Join Color C, Row 56 (RS): ch 1, 2 dc in first dc, dc across, do not turn. (58 dc) Drop Color C.
You will now work another right side row. Return to the beginning of the row just completed. Using Color A, Row 57 (RS): ch 1, 2 dc in first dc, dc across, turn. (59 dc) Fasten off Color A.
Color C Block
Using Color C, Row 58 (WS): ch 1, dc to last dc, 2 dc in lastdc, turn. (60 dc) Row 59 (RS): ch 1, 2 dc in first dc, dc across, turn. (61 dc) Rows 60 – 72: Repeat rows 58 and 59 ending after a row 58 repeat. (74 dc) Drop Color C.
Color C to D Stripes Join Color A, Row 73 (RS): ch 1, 2 dc in first dc, dc across, do not turn. (75 dc) Drop Color A.
You will now work another right side row. Return to the beginning of the row just completed. Using Color C, Row 74 (RS): ch 1, 2 dc in first dc, dc across, turn. (76 dc) Fasten off Color C.
Using Color A, Row 75 (WS): ch 1, dc to last dc, 2 dc in last dc, turn. (77 dc) Drop Color A.
Join Color D, Row 76 (RS): ch 1, 2 dc in first dc, dc across, do not turn. (78 dc) Drop Color D.
You will now work another right side row. Return to the beginning of the row just completed.
Using Color A, Row 77 (RS): ch 1, 2 dc in first dc, dc across, turn. (79 dc) Fasten off Color A.
Color D Block Using Color D, Row 78 (WS): ch 1, dc to last dc, 2 dc in last dc, turn. (80 dc) Row 79 (RS): ch 1, 2 dc in first dc, dc across, turn. (81 dc) Rows 80 – 88: Repeat rows 78 and 79 ending after a row 78 repeat. (90 dc)
Color D to E Stripes Join Color A, Row 89 (RS): ch 1, 2 dc in first dc, dc across, do not turn. (91 dc) Drop Color A.
You will now work another right side row. Return to the beginning of the row just completed. Using Color D, Row 90 (RS): ch 1, 2 dc in first dc, dc across, turn. (92 dc) Fasten off Color D.
Using Color A, Row 91 (WS): ch 1, dc to last dc, 2 dc in last dc, turn. (93 dc) Drop Color A.
Join Color E, Row 92 (RS): ch 1, 2 dc in first dc, dc across, do not turn. (94 dc) Drop Color E.
You will now work another right side row. Return to the beginning of the row just completed. Using Color A, Row 93 (RS): ch 1, 2 dc in first dc, dc across, turn. (95 dc) Fasten off Color A.
Color E Block Using Color E, Row 94 (WS): ch 1, dc to last dc, 2 dc in last dc, turn. (96 dc) Row 95 (RS): ch 1, 2 dc in first dc, dc across, turn. (97 dc) Rows 96 – 103: Repeat rows 94 and 95. (105 dc)
This is the full width and halfway point of the shawl. You will now work two plain rows before starting decrease rows.
Rows 104 and 105: ch 1, dc across, turn.
Decrease Side Row 106 (WS): ch 1, dc to last 2 dc, dc2tog, turn. (104 dc) Row 107 (RS): ch 1, dc2tog, dc across, turn. (103 dc) Rows 108 – 115: Repeat rows 106 and 107. (95 dc) Drop Color E.
Color E to D Stripes Join Color A, Row 116 (WS): ch 1, dc to last 2 dc, dc2tog, do not turn. (94 dc) Drop Color A.
You will now work another wrong side row. Return to the beginning of the row just completed. Using Color E, Row 117 (WS): ch 1, dc to last 2 dc, dc2tog, turn. (93 dc) Fasten off Color E.
Using Color A, Row 118 (RS): ch 1, dc2tog, dc across, turn. (92 dc) Drop Color A.
Join Color D, Row 119 (WS): ch 1, dc to last 2 dc, dc2tog, do not turn. (91 dc) Drop Color D.
You will now work another wrong side row. Return to the beginning of the row just completed. Using Color A, Row 120 (WS): ch 1, dc to last 2 dc, dc2tog, turn. (90 dc) Fasten off Color A
Color D Block Using Color D, Row 121 (RS): ch 1, dc2tog, dc across, turn. (89 dc) Row 122 (WS): ch 1, dc to last 2 dc, dc2tog, turn. (88 dc) Rows 123 – 131: Repeat rows 121 and 122 ending after a row 121 repeat. (79 dc) Drop Color D.
Color D to C Stripes Join Color A, Row 132 (WS): ch 1, dc to last 2 dc, dc2tog, do not turn. (78 dc) Drop Color A.
You will now work another wrong side row. Return to the beginning of the row just completed.
Using Color D, Row 133 (WS): ch 1, dc to last 2 dc, dc2tog, turn. (77 dc) Fasten off Color D.
Using Color A, Row 134 (RS): ch 1, dc2tog, dc across, turn. (76 dc) Drop Color A.
Join Color C, Row 135 (WS): ch 1, dc to last 2 dc, dc2tog, do not turn. (75 dc) Drop Color C.
You will now work another wrong side row. Return to the beginning of the row just completed. Using Color A, Row 136 (WS): ch 1, dc to last 2 dc, dc2tog, turn. (74 dc) Fasten off Color A.
Color C Block Using Color C, Row 137 (RS): ch 1, dc2tog, dc across, turn. (73 dc) Row 138 (WS): ch 1, dc to last 2 dc, dc2tog, turn. (72 dc)
Rows 139 – 151: Repeat rows 137 and 138 ending after a row 137 repeat. (59 dc) Drop Color C.
Color C to B Stripes Join Color A, Row 152 (WS): ch 1, dc to last 2 dc, dc2tog, do not turn. (58 dc) Drop Color A.
You will now work another wrong side row. Return to the beginning of the row just completed. Using Color C, Row 153 (WS): ch 1, dc to last 2 dc, dc2tog, turn. (57 dc) Fasten off Color C.
Using Color A, Row 154 (RS): ch 1, dc2tog, dc across, turn. (56 dc) Drop Color A.
Join Color B, Row 155 (WS): ch 1, dc to last 2 dc, dc2tog, do not turn. (55 dc) Drop Color B.
You will now work another wrong side row. Return to the beginning of the row just completed. Using Color A, Row 156 (WS): ch 1, dc to last 2 dc, dc2tog, turn. (54 dc) Fasten off Color A.
Color B Block Using Color B, Row 157 (RS): ch 1, dc2tog, dc across, turn. (53 dc)
Row 158 (WS): ch 1, dc to last 2 dc, dc2tog, turn. (52 dc) Rows 159 – 178: Repeat rows 157 and 158. (32 dc) Drop Color B.
Color B to A Stripes Join Color A, Row 179 (RS): ch 1, dc2tog, dc across, do not turn. (31 dc) Drop Color A.
You will now work another right side row. Return to the beginning of the row just completed. Using Color B, Row 180 (RS): ch 1, dc2tog, dc across, turn. (30 dc) Drop Color B.
Using Color A, Row 181 (WS): ch 1, dc to last 2 dc, dc2tog, do not turn. (29 dc) Drop Color A.
You will now work another wrong side row.
Return to the beginning of the row just completed.
Using Color B, Row 182 (WS): ch 1, dc to last 2 dc, dc2tog, turn. (28 dc) Drop Color B.
Rows 183 and 184 (RS): Repeat rows 179 and 180, including their color changes. (26 dc) Fasten off Color B.
Color A Block Using Color A,
Row 185 (WS): ch 1, dc to last dc, dc2tog, turn. (25 dc) Row 186 (RS): ch 1, dc2tog, dc across, turn. (24 dc) Rows 187 – 207: Repeat rows 185 and 186 ending after a row 185 repeat. (3 dc) Row 208 (RS): ch 1, dc3tog.
Fasten off color A. (1 dc)
Finishing Weave in ends. Block using preferred method, if desired.
Questions or Comments?
Please email me at info@mandobug.com if you need additional pattern support. Share your finished object on social media using @mandobug #550stripedshawl
Thank you for supporting me as a designer! And a huge thank you to my tech editor Fiat Fiber Arts!
◉ FREE Pattern: The entire written pattern for FREE.
◉ Video Tutorials: Helpful video tutorials going over special techniques needed for this pattern.
The Ice Cream Party Cardi is a simple and classic children’s cardigan. While the body uses a basic stitch, special care is given to the shoulder area for a good fit.
This cardigan is seamed, has a deep V-neck and a modified drop shoulder. Each piece is worked flat from the bottom up and mattress stitched together. After seaming, slip stitch ribbing is applied around the bottom, neckline, and sleeves of the cardigan.
Find a printer-friendly, PDF version of the Ice Cream Party Cardi at mandobug.com and on Ravelry.
The Cardi’sConstruction
The Ice Cream Party Cardi is a seamed modified drop shoulder, deep V-neck cardigan. The cardigan consists of 5 pieces crocheted seperately and seamed together. Each piece is worked flat from the bottom up and mattress stitched together. You’ll create a back panel, a front left panel, a front right panel, and two sleeves. After seaming, slip stitch ribbing is applied around the bottom, neckline, and sleeves of the cardigan. I have created video tutorials going over how to assemble and mattress stitch the cardigan together. I also made tutorials for how to work the applied slip stitch ribbing and create the buttonholes along the front buttonband.
Choosing the Right Yarn
This project uses a category 4 medium worsted weight cotton acrylic blend. I used Lion BrandIce Cream Cotton Blend which is now a discontinued yarn. The blend of cotton and acrylic adds an amazing drape to be desired for garments and the fiber content is an easy to care for blend that is machine washable. When looking for a substitute I recommend searching for an acrylic cotton blend such as theses yarns:
⊛ Mayflower Easy Care Classic Cotton Merino
⊛ Knit Picks Comfy Worsted
⊛ Caron Cotton Cakes
⊛ Plymouth Yarn Jeannee Worsted
And not to worry! If you’re not a fan of acrylic or cotton, this cardigan will work up wonderful in wool as well!
225 yds (206 m) / 3.5 oz (100 g) (shown in color Strawberry)
Hooks
US size H-8 (5.0 mm) hook or size needed to obtain gauge for body.
US size J-10 (6.0 mm) hook for ribbing or hook 1.0 mm larger than hook used for body.
Notions
6 Size ¾” buttons
I used “You’re Sweet” buttons from Shelly’s Buttons and More
Sewing Needle
Coordinated Thread
Tapestry Needle
5 Sewing Pins or Stitch Markers
Gauge
14.5 stitches, 11.5 rows = 4” in half double crochet.
Abbreviations
ch(s) – chain(s)
hdc2tog – half double crochet two together
hdc – half double crochet
sp – space
sc – single crochet
sl st – slip stitch
st(s) – stitch(es)
Special Stitches
Half Double Crochet Two Together (hdc2tog)
[Yarn over, insert hook in next stitch, yarn over and pull up loop] 2 times, yarn over and draw through all loops on hook.
Find a printer-friendly, PDF version of the Ice Cream Party Cardi at mandobug.com and on Ravelry.
Ice Cream Party Cardi Free Crochet Pattern
The Ice Cream Party Cardi is a seamed modified drop shoulder deep V-neck cardigan. Each piece is worked flat from the bottom up and mattress stitched together. After seaming, slip stitch ribbing is applied around the bottom, neckline, and sleeves of the cardigan.
Notes
Pattern is written using US crochet terminology.
Ch-1 at the beginning of the row is not worked into and does not count as a stitch.
Work slip stitch ribbing loosely.
Back Panel
Using smaller hook,
Ch 48, 50, 54 (58, 62, 64)
Rows 1 – 24, 30, 30 (32, 32, 38): ch 1, does not count as a st, and is not worked into here and throughout, hdc across, turn.
(48, 50, 54 (58, 62, 64) hdc)
You will now create a cut out for the armhole on both sides.
Row 25, 31, 31 (33, 33, 39): sl st in next 4 hdc, (sl st, ch 1, hdc) in next hdc, hdc across until last 4 hdc, leave those sts unworked, turn. (40, 42, 46 (50, 54, 56) hdc)
With wrong sides facing each other, mattress stitch the left front panel to the left side of the back panel along the shoulder shaping.
With wrong sides facing each other, mattress stitch the right front panel to the right side of the back panel along the shoulder shaping.
Top Sleeve Seams
Open the top shoulder seams just created, with right sides facing up, align sleeve in the arm hole cut out. Secure with pins or stitch markers. Mattress stitch the top of the sleeve into the front and back panels.
Side Body and Sleeve Seams
Fold the cardigan in half lengthwise along the top shoulder seam, with wrong sides facing each other, mattress stitch the front panel to the back panel along the side of the cardigan and down the folded sleeves.
Using larger hook, with right side facing up, join to a stitch near sleeve seam at wrist using a sl st,
Ch 6,
Row 1: ch 1, skip chain closest to hook, loosely sl st in back loop only of each st across, sl st in next 2 sts of wrist, turn.
Row 2: sk 2 sl sts, sl st in back loop only of each st across, turn.
Repeat Rows 1 and 2 around wrist.
Join ribbing by slip stitching through back loops of first and last rows. Fasten off yarn.
Bottom Ribbing
Using larger hook, with right side facing up, join to bottom front edge of left front panel using a sl st,
Ch 6,
Row 1: ch 1, skip chain closest to hook, loosely sl st in the back loop only of each st across, sl st in next 2 sts of bottom edge, turn.
Row 2: sk 2 sl sts, sl st in back loop only of each st across, turn.
Repeat Rows 1 and 2 around bottom of cardigan. Fasten off yarn.
Button Band Ribbing
Note – You will work ribbing into the side of the bottom ribbing of the front panel, then you will work ribbing into the hdc row ends of the front panel. Evenly space slip stitches along the hdc row ends by working 3 rows of ribbing over 2 hdc row ends.
Using larger hook, with right side facing up, join to the edge of the bottom ribbing on the right front panel using a sl st,
Ch 6,
Row 1: ch 1, skip chain closest to hook, loosely sl st in back loop only of each st across, sl st 2 into front panel edge, See Note above, turn.
Row 2: sk 2 sl sts, sl st in back loop only of each st across, turn.
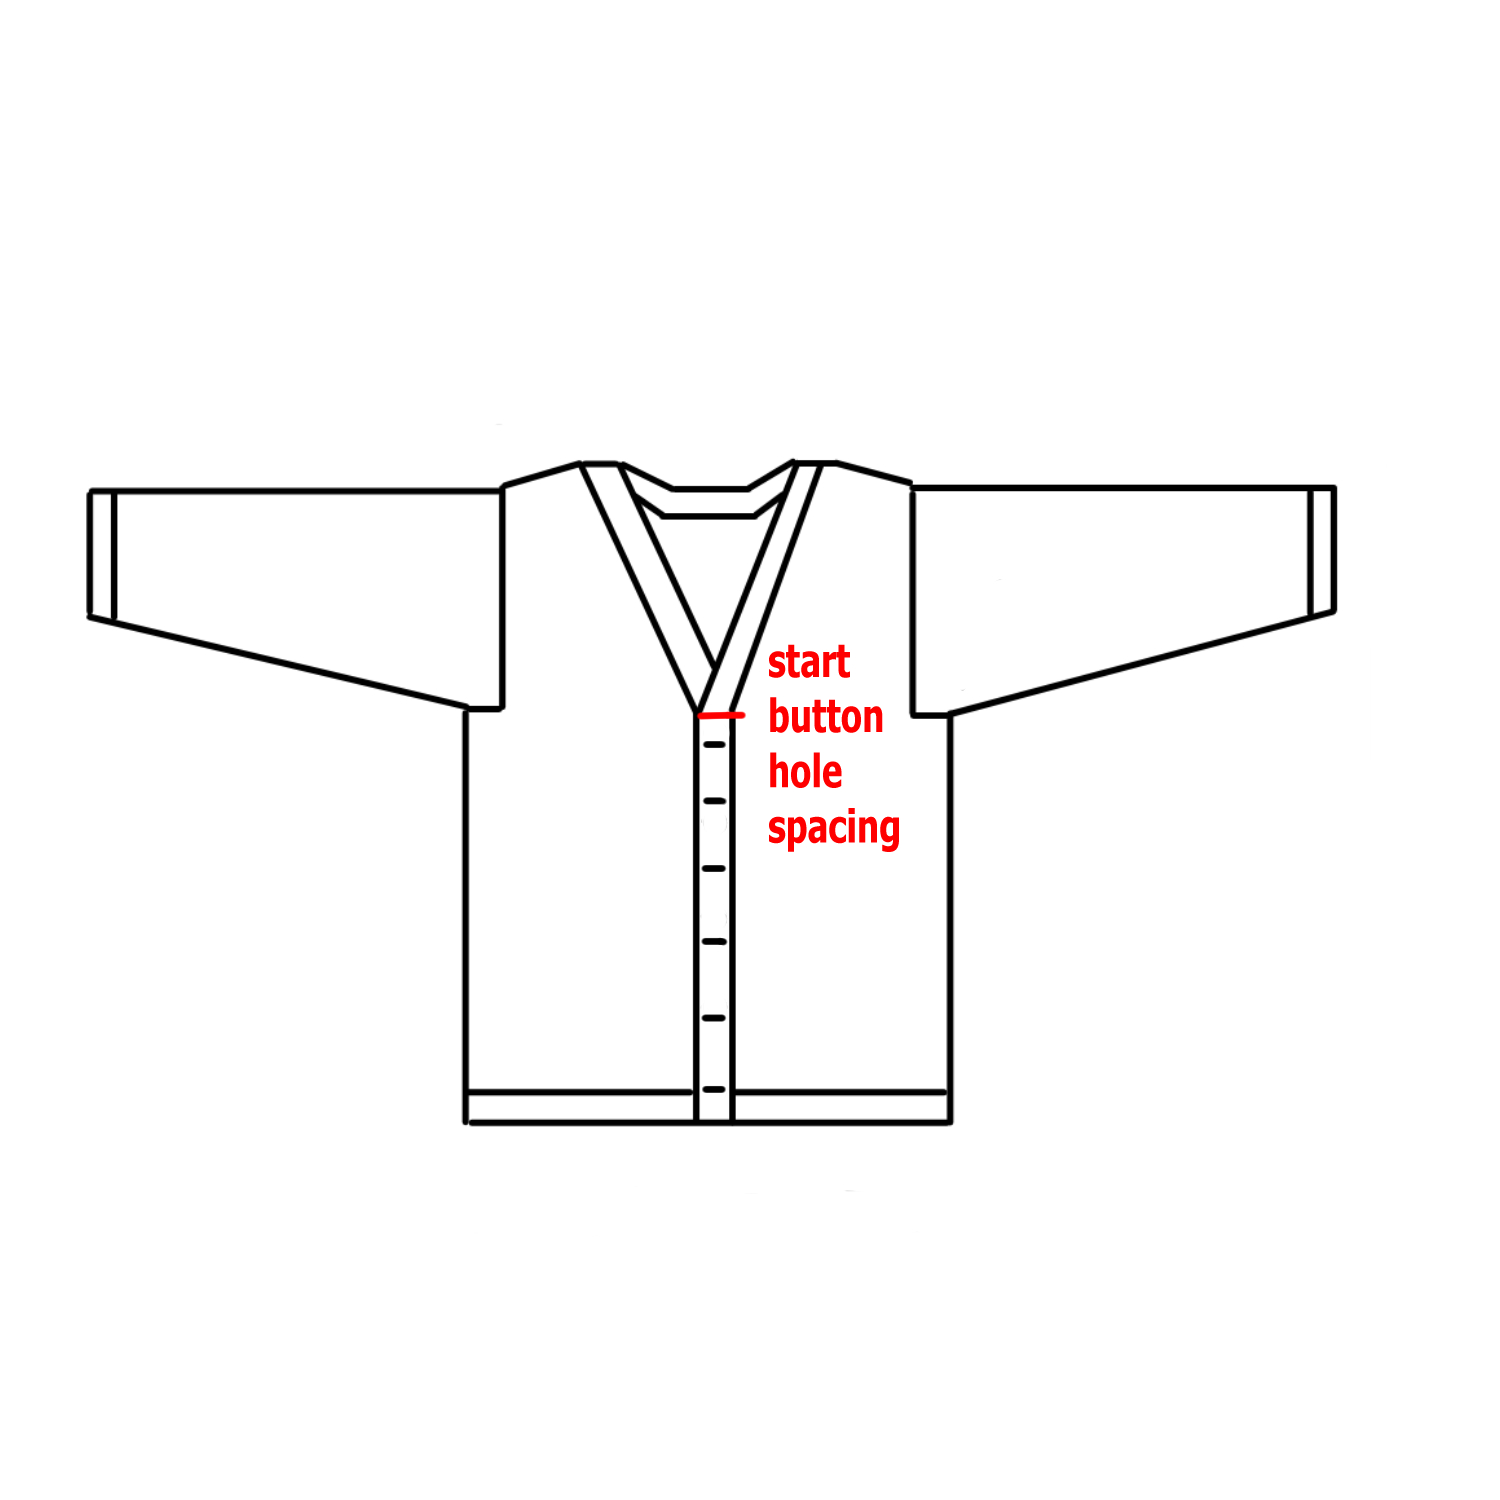
Repeat Rows 1 and 2 across the front left panel of the cardigan, across the back panel, and across the front right panel until you reach its straight edge. See Button BandDiagram.
Buttonhole Row: ch 1, skip chain closest to hook, loosely sl st in the back loop only of next 2 sts, ch 2, sk 2 sts, sl st in back loop only of next two sts, sl st in next 2 sts of front panel, turn.
Next Row: sk 2 sl sts, sl st in back loop only of next 2 sl sts, 2 sc in ch-2 sp, sl st in back loop only of next 2 sl sts, turn.
Continue repeating Rows 1 and 2 along straight edge of front left panel evenly spacing out 5 more buttonhole rows. This will be approximately every 6, 8, 8 (8, 8, 10) rows. You can use stitch markers to mark where you’d like to place your button holes to ensure they are evenly spaced.
Fasten off yarn.
Buttons
Using a sewing needle and coordinating thread, sew each ¾” button centered on left front panel ribbing across from buttonholes.
Weave in any remaining ends using a tapestry needle.
Questions or Comments?
Please email me at info@mandobug.com if you need additional pattern support.
Share your finished object on social media using @mandobug#icecreampartycardi
Thank You!
Thank you for supporting me as a designer! And a huge thank you to my tech editorFiat Fiber Arts and pattern testers!
◉ FREE Pattern: The entire written pattern for FREE.
◉ Video Tutorial: A helpful video going over the required materialsand how to work each row in the cowl.
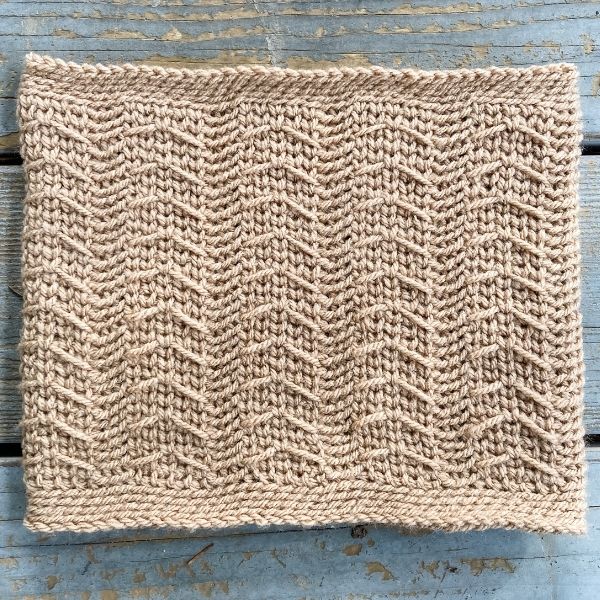
The Gulls and Slips crochet cowl is an intermediate crochet pattern designed to imitate the look of the gulls and garter knit stitch. You can crochet this stunning textured cowl by weaving a floater strand of yarn through your stitches as you crochet to leave floats behind. Later, you’ll come back and crochet those strands into place creating the beautifully textured arrows of the design.
Find a printer-friendly, PDF version of the Gulls and Slips Cowl at mandobug.com and on Ravelry.
The CowlConstruction
This crochet cowl is worked in the round from the bottom up and is easy to customize in size. I’ll be sharing the multiples you need to repeat the stitch pattern so you can customize the circumference of the cowl, as well as the multiple for the row repeats so you can easily customize the length of your cowl.
Choosing the Right Yarn
This project uses a category 4 medium worsted weight 100% acrylic yarn. I used Lion BrandBasic Stitch Premiumwhich is now discontinued, but you can get Lion Brand Basic Stitch Anti Pilling which is a very close match. This fluffy worsted weight 100% acrylic yarn has a tight twist perfect for creating the crisp stitch definition to really make this stitch pattern pop. If this isn’t the right yarn for you, I recommend searching for a category 4 medium worsted weight yarn that has a high twist and a smooth texture. Yarns that have low twist or have a fuzzy halo will distract from the stitch pattern making it hard to see. This is also true for highly variegated yarns. I recommend avoiding those as well, unless you don’t mind the colors distracting from the overall pattern.
Gulls and Slips Cowl Details
Skill Level
Intermediate (uses complex stitches, simple shaping, and skilled tension control)
Finished Measurements
A – Circumference
20” (51 cm)
B – Length
9” (23 cm)
Yarn Requirements
Worsted Weight (#4 Medium)
175 yds (165 m)
Suggested Yarn
1 skein Lion Brand Basic Stitch, 100% Acrylic,
185 yds (170 m) / 3.5 oz (100 g)
Hooks
US size K-10.5 (6.5 mm) hook or size needed to obtain gauge.
Notions
Tapestry Needle
Removable Stitch Marker (optional for marking the beginning of the round)
Gauge
16 stitches, 17 rows = 4” in Gulls and Slips stitch pattern (Body Rounds 2-4 repeated)
Insert hook from front to back through the center of the two vertical posts (legs) of the single crochet being worked into, yarn over and pull up a loop, yarn over and draw through both loops on hook.
Floater Yarn Forward (fyf)
Move floater yarn from the back of work to the front under working yarn.
Floater Yarn Back (fyb)
Move floater yarn from the front of work to the back under working yarn.
Waist Coat 1 Under Loose Strand (wc1 uls)
Insert hook under floater yarn below, then through the center of the two vertical posts (legs) of the single crochet being worked into, yarn over and pull up a loop, yarn over and draw through both loops on hook.
Get the printer-friendly, PDF version of the Gulls and Slips Cowl at mandobug.com and on Ravelry.
Gulls and Slips Video Tutorial
Gulls and Slips Cowl Free Pattern
The Gulls and Slips Cowl is worked from the bottom up with a slip stitch border on the top and bottom. The body is created by using the Gulls and Slips stitch pattern. This pattern uses an unusual technique of weaving a second “floater” yarn in and out of your work on occasional rows.
Pattern Notes
You need to use two different strands of yarn in some rounds. You can hand wind your yarn into two balls or you can wind it into a cake using a ball winder and pull from the inside and outside of the cake.
Work all stitches loosely.
Do not slip stitch to join at the end of the round.
Use a stitch marker to keep track of the beginning of the round.
For video support watch the Gulls and Slips Cowl video tutorial.
Bottom Border
Ch 80 (or any multiple of 8) loosely.
It is very important that you work ALL stitches in the entire pattern loosely. If any stitches are worked too tightly it becomes difficult to insert the hook into the correct spaces.
Round 1: Join to work in the round by working a slip stitch into the back bump of first chain, being careful not to twist the stitches, sl st in back bump of each chain around, do not slip stitch to join here and throughout pattern. Use a stitch marker to keep track of beginning of round.
Rounds 2 – 4: sl st in blo of each stitch around.
Body
Round 1: [sl st 3 in blo, sc 5 in blo] around.
You will now join a second strand of “floater” yarn that will weave through the front and the back of your work creating “floats.” Be careful not to pull floats too tightly.
Round 2: Join a second strand of yarn underneath the working yarn with the tail in front, [sl st 3 in blo, fyf, wc 5, fyb] around.
Leave the floater yarn in the back, you won’t work with this yarn again until you repeat this round again later.
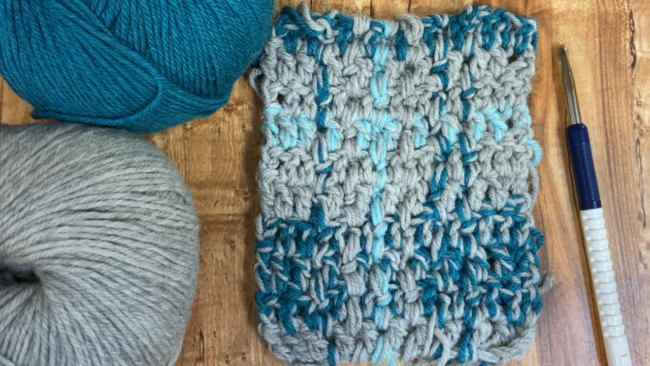
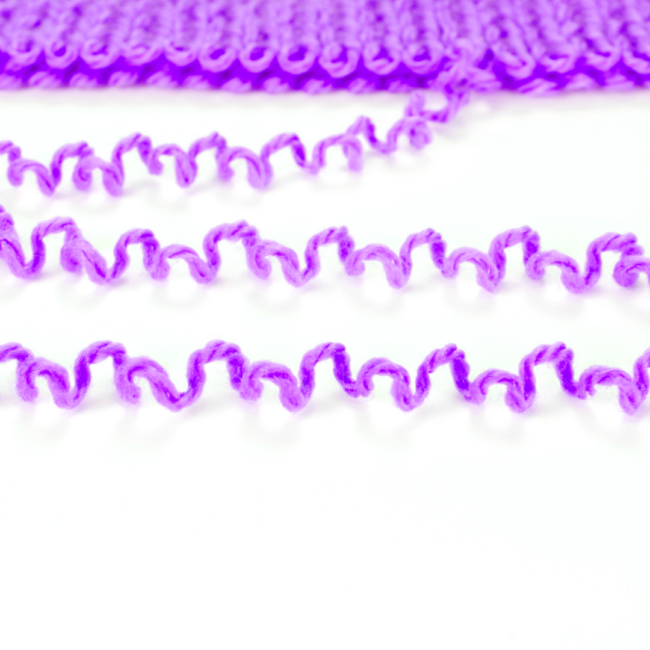
Create plaid the easy way! Woven surface crochet creates a beautiful fabric with a woven appearance perfect for creating plaid without having to do any colorwork changes mid-row or sewing! Instead, you are weaving surface crochet in and out of your fabric. This technique is not just for plaid either. It can be used for other color-striped patterns as well. Learn the stitch combination below and have fun using it creatively.
How to Crochet: Woven Surface CrochetStitch Pattern
Tip: Work woven surface crochet loosely to avoid gathering rows too tightly and warping the finished fabric.
Woven Surface Crochet:
Join yarn using a woven surface crochet join, [top surface crochet, chain 2, bottom surface crochet, chain 1] repeat along the length of the fabric. Fasten off yarn and weave in ends. When working stripes of woven surface crochet next to each other, alternate whether you start with a top surface crochet or a bottom surface crochet.
Woven surface crochet join:
Insert hook in space between indicated stitches at bottom of piece, from back to front, yarn over and pull up a loop, chain 2.
Top surface crochet:
Insert hook in space between next set of stitches from front to back, bring hook to front in space between next stitches, yarn over and pull through all loops on hook.
Bottom surface crochet:
Remove hook from working loop, skip 1 space between stitches, insert hook in next space between stitches from top to bottom, front to back, bring hook to front in skipped space, place working loop back on hook and pull through.
This post contains affiliate links that support the content onmandobug.com
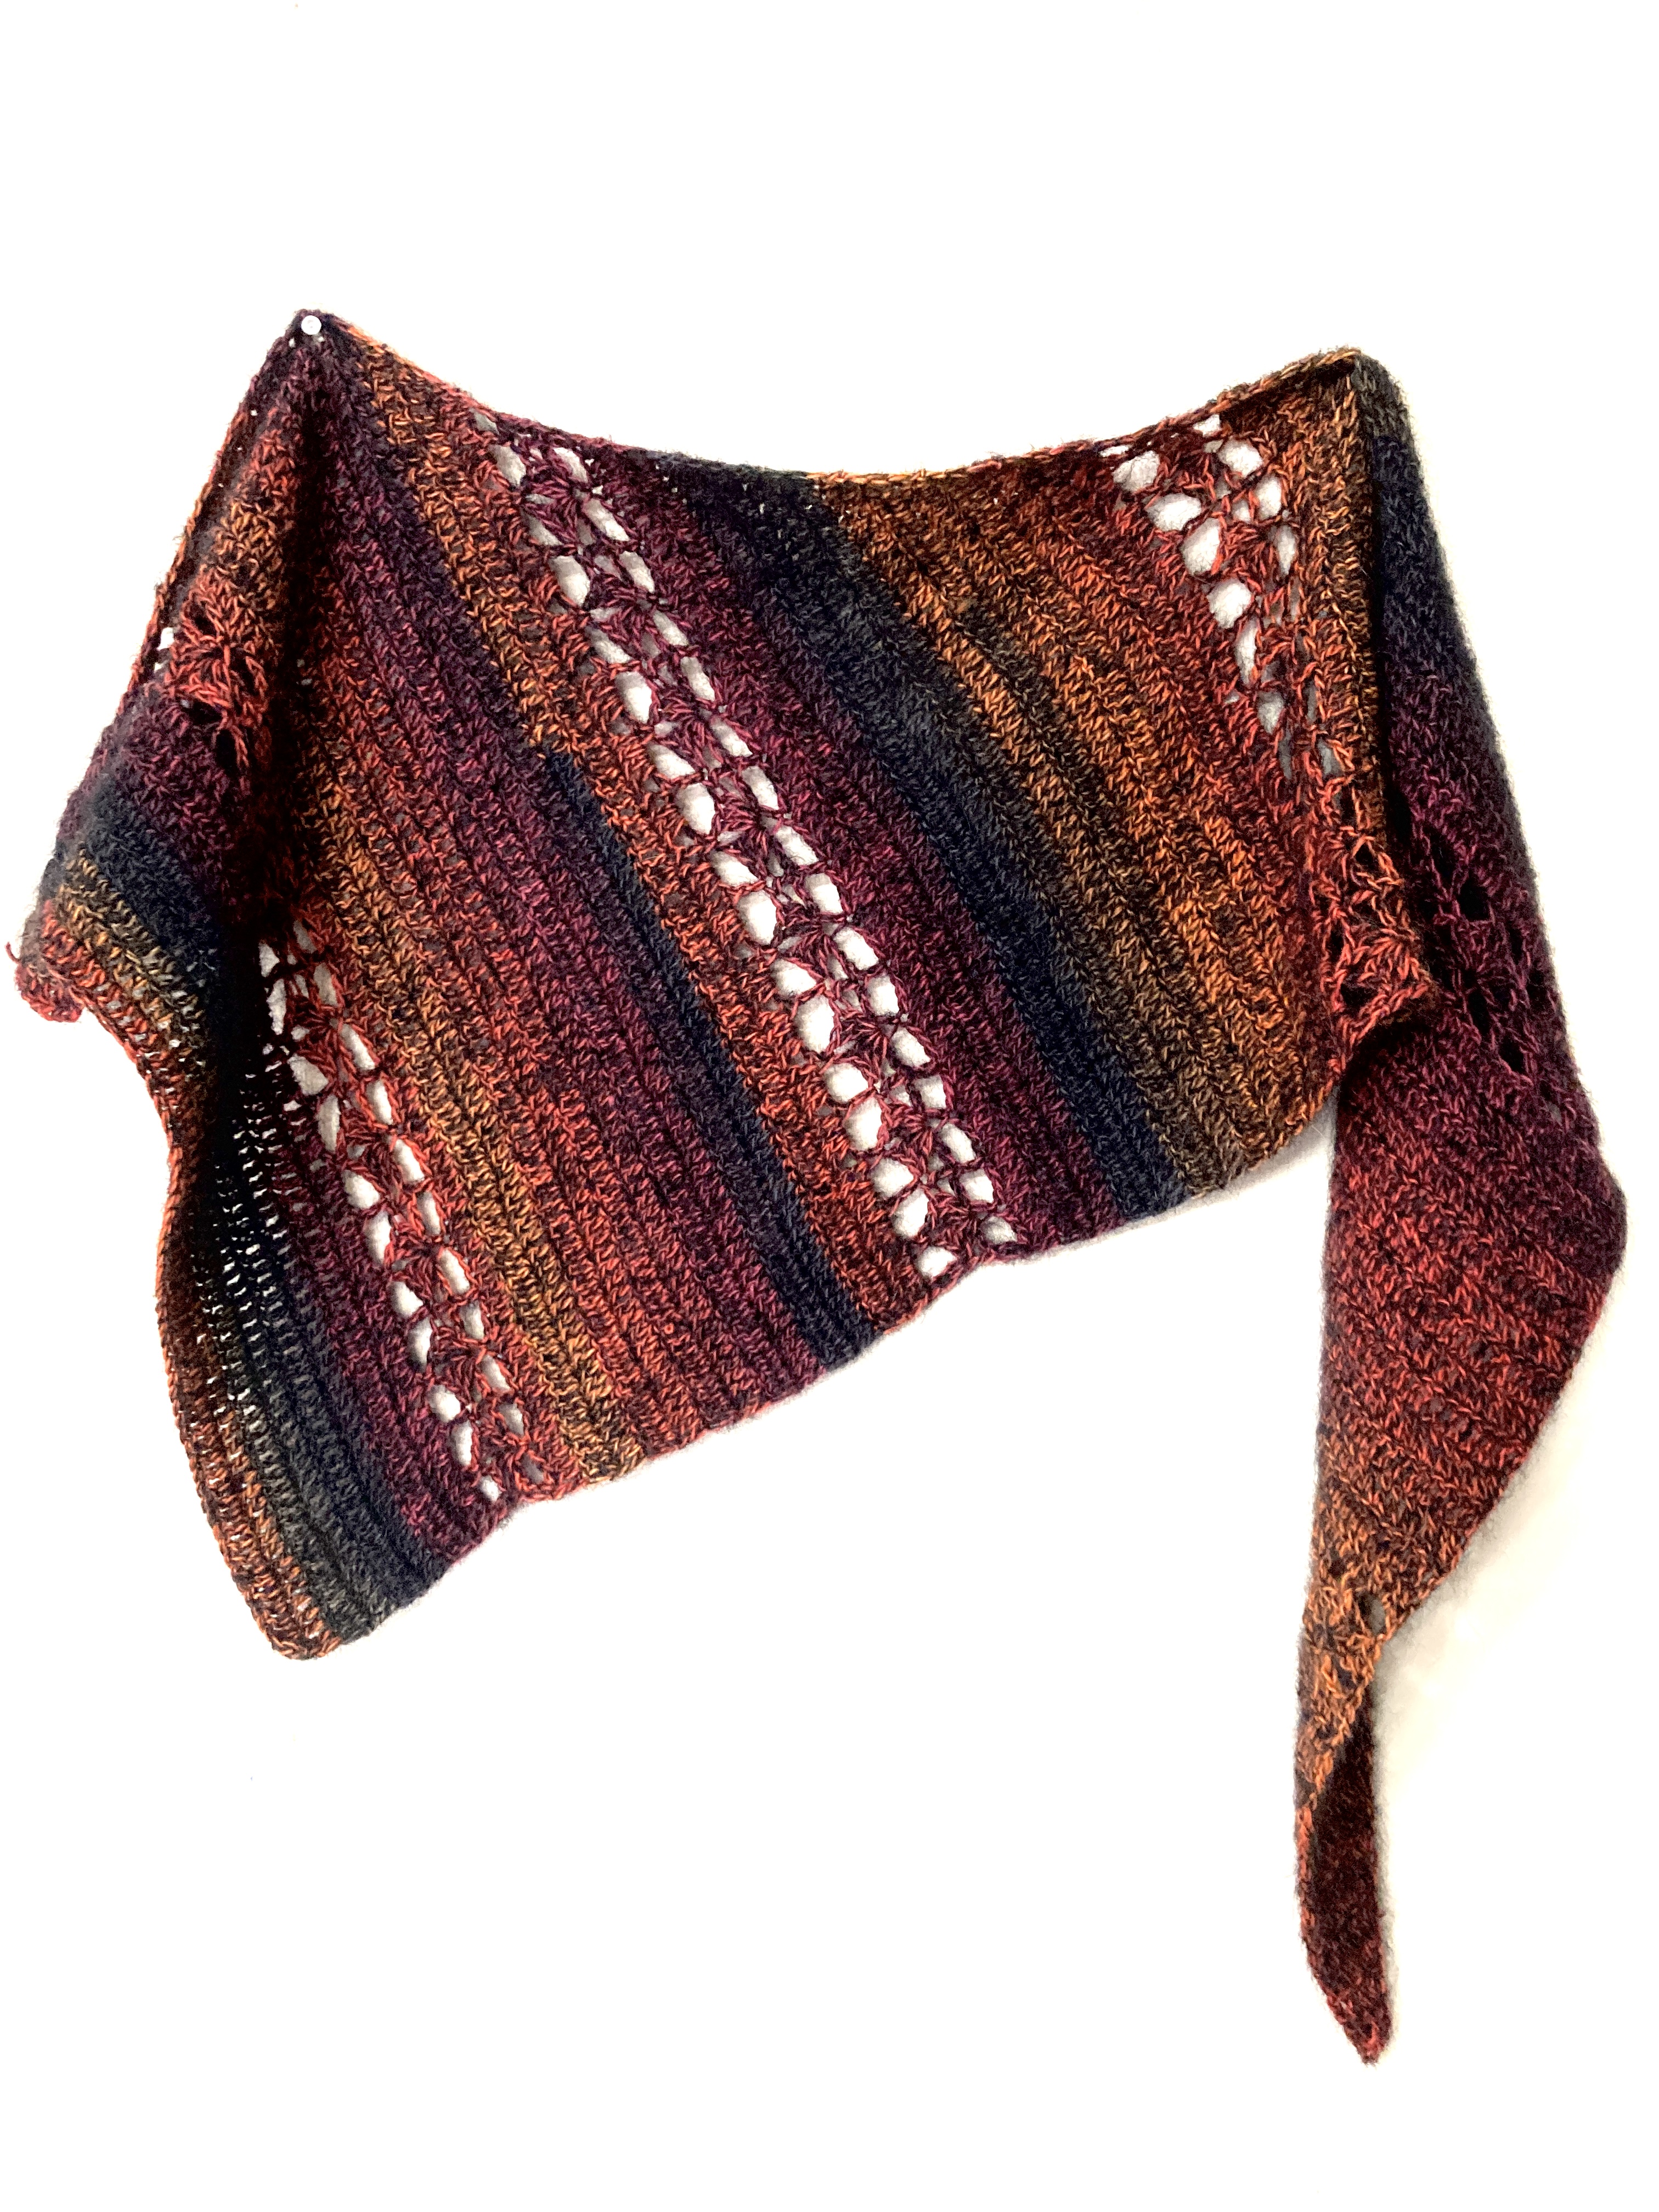
The Simple Asymmetric Mohair Shawl is a beginner-friendly crochet shawl designed to be simple and fun!
The use of basic crochet stitches makes it easy to create. While its asymmetric shape makes it easy to adjust its size as well as easy to wear.
This crochet shawl is worked flat in one piece holding a strand of a gradient fingering weight yarn with a strand of laceweight mohair yarn. And not to worry! If you are sensitive to mohair, you can use a DK weight yarn in place of the fingering weight and lace weight held together. To create the asymmetric shape, increases are worked along one edge of the shawl only. And simple lace stripes are placed between rows of double crochet to make this project simple yet fun!
TheSimple Asymmetric Mohair Shawl
This post includes
◉ FREE Pattern: The entire written pattern for FREE.
◉ Video Tutorial: A helpful video going over the required materialsand how to work each row in the shawl.
◉ FREE PDF Download: The PDF download is an ad-free easy to follow version of the pattern that includes charted instructions!
The Asymmetric ShawlConstruction
One way to create a basic asymmetric shawl is to place increases along one edge of the shawl only. This keeps one edge of the shawl straight while the other edge begins to angle out as the shawl increases in width.
This Simple Asymmetric Mohair Shawl has one increase along the right edge of the shawl make this a very simple pattern to follow. The constant rate of increases make it really simple to add a few striping rows of a simple lace pattern that makes this project so much more than straight double crochet.
Choosing the Right Yarn
This project holds a strand of category 1 super fine, fingering weight yarn with a category 0 lace weight mohair yarn.
Keep reading for important information when it comes to substituting yarns!
For this project I chose to use one ball of Happy Sheep Magic Sock Wool. This affordably priced superwash wool and nylon blend is a category 1 super fine, fingering weight yarn. It has vibrant slow changing colors that make it almost impossible to put down once you start working with it! It’s single ply nature gives it a slightly handspun appearance adding even more texture to basic stitches.
If Happy Sheep Magic Sock Woolisn’t right for you, I would recommend looking for another slow gradient changing category 1 super fine, fingering weight yarn to get an effect similar to that of the original pattern. The yarn doesn’t have to be a wool blend either! You can definitely grab your favorite slow gradient cottons for this pattern as long as you still plan to hold it with a strand of lace weight mohair yarn. If you decide to work this shawl without the lace weight mohair you will need to choose a category 3, DK weight slow gradient yarn.
Speaking of mohair yarn, for this project I chose to use two balls of Mayflower Super Kid Silk. It’s classified as a category 0 lace weight yarn but don’t be fooled. Mohair lends a wonderfully soft and fuzzy halo that works up thicker than your typical lace weight gauge. This helps give a soft outer layer to your project that keeps it light yet keeps you extra warm! In the case of this specific project, holding a strand of black mohair along with the bright and vibrant colors of the Hot N’ Spicy colorway of Happy Sheep Magic Sock Wool really toned down the colors turning them into the more subdued colors of fall.
Pairing solid color mohair yarns with slow gradient yarns can produce the most wonderful effects. Not to mention, it’s a great opportunity to experiment with color! Find Mayflower Super Kid Silk on Hobbii’s Website.
If you are sensitive to mohair or not a fan of fuzzy yarns and projects I recommend substituting a slow gradient DK weight yarn instead of using a strand of fingering weight with a strand of lace weight mohair. Any fiber contents should work for this project. You can go stash diving! Who knows? You may just have 415yds of a category 3 DK weight yarn hanging around and ready to become this shawl!
Simple Asymmetric Mohair Shawl Details
Skill Level Beginner (uses basic stitches with simple shaping)
Suggested Yarn 1 ball Happy Sheep Magic Sock Wool, 70% Superwash Wool, 30% Polyamide, 437 yds (400 m), 3.5 oz (100 g) (shown in color 17 Hot N Spicy) 2 balls Mayflower Super Kid Silk, 76% Mohair, 24% Silk, 213 yds (195 m), 0.9 oz (25 g) (shown in color 02 Black)
Hook US size 7 hook (4.5 mm) or size needed to obtain gauge. Notions Optional removable stitch marker (for marking the increase side of the shawl)
Finished Measurements
Length: 49.5″ (125.75cm)
Width: 22.5″ (57cm)
Gauge 17 stitches, 7.5 rows = 4” in double crochet, after blocking.
Simple Asymmetric Mohair Video Tutorial
Simple Asymmetric Mohair Shawl Free Pattern
Abbreviations ch – chain dc– double crochet RS – right side sc – single crochet sk – skip sp(s) – space(s) WS – wrong side
This simple asymmetric shawl is worked flat in one piece holding a strand of fingering weight and a strand of lace weight together. Increases are worked along one side of the shawl only. Simple lace stripes are placed between rows of double crochet to make this project simple yet fun!
Notes ● Pattern is written using US crochet terminology. ● Pattern repeats within rows are placed in brackets. ● Pattern is worked holding a strand of fingering weight with a strand of lace weight at the same time. ● Use a removable stitch marker to mark the increasing side of the shawl. ● Ch-1 at the beginning of the row does not count as a stitch.
Using a strand of fingering weight held together with a strand of lace weight, make a magic ring. Row 1 (WS): ch 1, (does not count as a stitch here and throughout), 3 dc in magic ring,turn. (3 dc) Row 2 (RS): ch 1, 2 dc in first dc, dc across, turn. (4 dc) Row 3 (WS): ch 1, dc to last dc, 2 dc in last dc, turn. (5 dc)Rows 4-15: Repeat rows 2 and 3. (17 dc) Row 16: ch 1, 2 dc in first dc, [ch 3, sk 3 dc, sc in next dc, ch 3, sk 3 dc, dc in next dc] across, turn. (4 dc, 2 sc, 4 ch-3 sps) Row 17: ch 1, dc in first dc, [sk ch-3 sp, (3 dc, ch 2, 3 dc) in sc, sk ch-3 sp, dc in next dc] until last dc, ch 1, dc in last dc, turn. (2 (3 dc,ch 2, 3 dc) clusters, 4 dc, 1 ch-1 sp) Row 18: ch 1, dc in first dc, ch 2, sk ch-1 sp, dc in next dc, [ch 3, sk 3 dc, sc in ch-2 sp, ch 3, sk 3 dc, dc in next dc] across, turn. (4 dc, 2 sc, 4 ch-3 sps, 1 ch-2 sp) Row 19: ch 1, dc in first dc, [3 dc in ch-3 sp, dc in next sc, 3 dc in ch-3 sp, dc in next dc] until ch-2 sp, 2 dc in ch-2 sp, 2 dc in last dc, turn. (21 dc)
Repeat Rows 4-19 four times. Repeat Rows 4-13 one time.
Fasten off yarn.
Finishing Weave in ends. Wet block laying flat to dry.
Questions or Comments? Please email me at info@mandobug.com if you need additional pattern support. Share your finished object on social media using @mandobug #simpleasymmetricmohairshawl
Thank You! Thank you for supporting me as a designer! And a huge thank you to my tech editor Fiat Fiber Arts!
UPDATE: The Lift Your Spirits MCAL is now over. The pattern is now available for purchase here.
What is a Mystery Crochet Along (MCAL)?
A mystery crochet along is an event where a group of people crochet the same mystery project during a specific period of time. The mystery pattern is released in pieces known as clues. Each clue reveals the next series of instructions for the pattern slowly revealing the project.
How do I participate?
Lift Your Spirits will be a free pattern for the duration of the MCAL which is September 3rd – October 15th, 2021. After that the pattern will be available for $6.00. During the MCAL you can download the free pattern clues as they are released on my website or on Ravelry.
Clues will be released at 9am PT / 12pm ET every Friday for the duration of the MCAL. See timeline below:
September 3rd, Clue #1
September 10th, Clue #2
September 17th, Clue #3
September 24th, Clue #4
October 1st, Clue #5
October 8th, Clue #6
The MCAL chat will be hosted in the Mandobug Crafters Corner Facebook Group. That is where you can ask questions, share your progress by posting pictures, and also see how other participants’ projects are working up.
You can also tag your project on other social media platforms by using #liftyourspiritsmcal and #liftyourspiritsshawl . By using hashtags on your posts other participants can see your progress. You can also follow those hashtags to see the progress of others.
I will also be hosting a YouTube Live MCAL Chatevery Saturday for the duration of the MCAL at 9am PT / 12pm ET on my YouTube channel. Bring your project and beverage of choice as we chat all things crochet and crochet this project together.
What can you tell me about the pattern?
Description
Lift Your Spirits is a ghost inspired pattern. And let me be clear here, my inspiration is very literal. THERE WILL BE GHOSTS, lots of ghosts actually, stitched up using the most exciting combination of stitches into a stunning beaded shawl. The pattern instructions are both written and charted.
Skill Level
Intermediate (uses several stitches with complex shaping)
Stitches used are provided in US terms and include ch, dc, dc2tog, dc3tog, hdc, sc, and sl st.
(365m) / 3.5oz (100g) in the Unicorn Blood colorway.
Please Note: Schmutzerella Yarns is a small independent yarn dyeing company. If you plan to use their yarn, place your order as far in advance as possible to ensure it will arrive on time!
Hooks
US size E hook (3.5 mm) or size needed to obtain gauge.
US size 14 steel hook (0.75 mm) – for optional beading
All Schmutzerella Yarn orders will receive this special MCAL sticker while supplies last.
I highly recommend using a light solid or semi solid color for this pattern. A dark
solid or semi solid color will still work nicely and one of my pattern testers used a
gradient yarn that looks pretty awesome as well. The only colors I would not
recommend are highly variegated colorways. There are details in the pattern that will be lost if you
decide to go with a busy yarn.
How big are the sizes?
The small size is what I would call a shawlette. You’ll definitely need a shawl pin in order to wear it. Where the large size is what I would call a shlanket, a shawl so big it’s like a small blanket.
Are you in!?
Let me and others know you’ve joined by sharing a picture of your gathered materials or your gauge swatch in the Mandobug Crafters Corner Facebook Group or by using #liftyourspiritsmcal and #liftyourspiritsshawl on any other social media platform.
This post contains affiliate links. If you make a purchase following a link, I’ll receive a small commission. Thank you for the support!
Have you ever knit a raglan sweater that just didn’t fit, even if you met gauge? Maybe you had a raglan cardigan that kept falling off your shoulders? Or maybe it was a pullover that had extra fabric in the armpits? Why does this happen? What’s the solution? And how do you find patterns with these solutions in them?
The Basic Top Down Seamless Raglan Structure Explained
Top-down seamless raglan sweaters start with the neckline and typically have 8 – 10 increase locations depending on the sweater’s neckline and whether it is a pullover or a cardigan.
Basic Top Down Seamless Raglan Pullover
For a basic raglan crew neck pullover, the entire neckline will be cast on/chained and joined in the round with 8 increased locations. These increased locations are placed on both sides of a center seam at the edge of the sleeve stitches.
Basic Top Down Raglan V-Neck or Cardigan
For a V neck shape the beginning cast on/chain is worked flat for a few rows and there are additional increases placed along the outer edges of the front panel. This is also how top-down seamless raglan cardigans are shaped until their desired front width.
The consistent rate of increases stacked on top of each other at the edges of the sleeves creates four straight seamlike lines running from the neckline to the underarm at the point at which the sleeve stitches are separated from the body. This is typically at the end of the yoke when the design reaches its full bust measurement.
The Problems
While this construction is very simple to create and easy to follow it can create some problems for a proper fit.
1. Equally Dimensioned on the Front and Back
The constant rate of increases assumes that the upper body circumference increases equally in the front and back. If your cross-back measurement is close to half your full bust circumference then this shape will fit you just fine, but if your cross-back measurement is less than half of your full bust circumference, then this sweater will not fit you well at all. The larger a women’s full bust circumference in comparison to her upper bust circumference, the more unflattering the fit. For example, if a woman with a large difference between their upper bust measurement and their full bust measurement makes the size to their full bust measurement then they will have too much fabric in the back of their sweater as well as their underarm. If they only knit to their upper bust measurement instead the sweater will be tight in the armpits and will not fit their full bust without additional alterations.
An equally dimensioned front and back also creates a problem for how the neckline sits on the shoulders. There is a natural curve to the top of your back shoulders and without the extra rows on the back to account for that curve the neckline may sit awkwardly or be uncomfortable.
2. Poor Armhole/Armscye Shaping
Set In Sleeve Shaping vs Raglan Shaping
The armscye shaping on a topdown seamless raglan is a straight line that does not reflect the natural curve of the armpit like a typical set-in sleeve construction. This creates excess fabric where the armpit curves inwards. This is not as noticeable in raglan-style t-shirts made out of thin woven cotton fabric, but it is very noticeable when made using a worsted weight yarn or thicker.
This construction also lacks a seam at the top of the shoulder which helps keep the weight of the fabric from slipping off the shoulders which is a huge problem for raglan shaped cardigans.
The Solution
Adjust the Shaping
Patterns are designed based on measurement averages which means it’s already unlikely that it uses your exact measurements. It’s not unusual to have to do some pattern adjusting. Luckily modern pattern designers have come up with adjustments for seamless raglan shaping that offer a better fit.
5 Modern Raglan Adjustments
Here are five of the most common raglan adjustments that modern pattern designers use to create a better-fitting top-down seamless sweater.
1. Short Row Shaping at the Back Neck
To allow for a better fitting neckline on crew neck raglan pullovers, designers will add short row shaping along the back of the neck to raise the back above the front to account for the raised curved shape of the upper back shoulders. You can usually tell if a designer has made this adjustment by looking at the pattern’s photos. It is also often mentioned in the description of the pattern.
2. Knit/Crochet to the Upper Bust Measurement and Cast On/Chain Extra Underarm Stitches (Modified Raglan)
Set In Sleeve vs Raglan vs Modified Raglan
Knitting/crocheting to the upper bust measurement instead of the full bust eliminates the excess fabric in the inner curve of the armpit. To make sure the sweater will still fit the full bust measurement extra underarm stitches are added when separating the sleeves from the body. This massive increase at the underarm mimics the shape needed to contour the rapid outward curve of the lower armpit. This concept is explained in-depth and drawn out beautifully over on Tess Knits website. This adjustment is usually built into the pattern and can be a difficult adjustment to notice in a pattern unless the designer has described making this adjustment. Sometimes designers will describe this kind of adjustment as a modified raglan.
3. Change the Rate of Increases to Contour Body Curves (Compound Raglan)
Set In Sleeve vs Raglan vs Compound Raglan
Instead of a steady increase rate, the compound raglan starts off with a slower rate of increases at the top and slowly increases faster and faster closer to the end of the yoke. The increases stay stacked creating the iconic raglan line, but the changing rate of increases curves the line towards the underarm. This adjustment better mimics the shape of the armpit resulting in a better fit. You can find this adjustment made in raglan sweater designs described as compound raglans such as the Corinne Oval Pullover by Jennifer Wood. That pattern as well as several other sweaters using compound shaping can be found in Jennifer’s book Refined Knits.
4. Remove Early Sleeves Increases
Set In Sleeve vs Raglan vs Early Sleeve Increases Removed
This is another method that adjusts the traditional raglan’s even rate of increase. Instead of increasing the sleeves starting at the cast on/chain, increases are made on the front and back sections only, until a portion of the full length at the top of the shoulder has been reached. This shaping hugs the shoulder and provides a snug fit that helps keep raglan-shaped cardigans from falling off. This type of shaping can be seen in the Beekeeper Cardigan by Marie Greene. She describes it as “a unique saddle shoulder shaping that hugs your shoulders.”
This method is taught in the Cocoknits Sweater Workshop by Julie Weisenberger and is a heavy modification of the traditional raglan. It is a top down seamless sweater with set-in sleeves. There is short row shaping to contour the upper back and tops of the shoulder. The pattern also uses a color-coded worksheet that helps you increase at the perfect rates to fit your body’s measurements. The Cocoknits Sweater Workshop book is full of sweaters designed by Julie Weisenberger that use this method.
How to Find Top Down Seamless Sweater Patterns That Will Fit Well
Adjusted raglan shaped sweaters are becoming more and more common. Here are some tips for finding better fitting seamless sweaters.
Look to see if any adjustments are mentioned in the pattern’s description. Look for words such as “modified raglan” or “compound raglan”.
Look for patterns described as top down and seamless that omit the word raglan, or that describe the shaping as something else like the description of “unique saddle shoulder shaping” in the Beekeeper Cardigan.
Look at the pattern’s photos taking particular note of the fit on the neckline and the armpit.
Look for pictures of the sweater being modeled on someone that has similar body measurements as you. Y
Check the patterns schematic & measurements making note of the cross-back measurement if provided and compare that to the bust measurement.
Ffollow any of the sweaters out of the Cocoknits Sweater Workshop book for a top-down seamless sweater that will fit your body like a glove.
For more information check out these great resources:
As a new designer I’ve spent countless hours ripping back designs and I’ve narrowed it down to the 4 biggest knitting and crochet design mistakes that end in massive frogging sessions. The great news is that these mistakes can be easily avoided! The bad news is that it takes time outside of working on your actual sample to do this but trust me, it is worth it in the end. You really can save a massive amount of time.
I’ve made a video outlining this blog post if you’re more of a visual person.
Otherwise you can read everything below, real quick before we get started…
What is Frogging?
If you haven’t heard of this term before it comes from RIP-IT, RIP-IT. It sounds very similar to the RIBBIT of a frog but stands for ripping out your knit or crochet project. Sometimes we frog a row, sometimes we frog an entire sweater. Frogging can be especially painful when you experience it for the first time, when you’re on a deadline, or when you’re undoing a large amount of work. This is why I’m also sharing 2 coping mechanisms for frogging at the end of this article.
DISCLAIMER
This post is about avoiding massive frogging when designing a new pattern and is not meant to be interpreted as “the only way to design”.
Now let’s get into the major mistakes that lead to frogging when designing a new pattern.
4 Biggest Design Mistakes That Lead to Massive Frogging…and How to Avoid Them
Mistake #1
Not Swatching
Without a swatch, you are LITERALLY guessing at everything and purely winging it. It may feel like you’re saving time by skipping the swatch and if you do everything right on the first try, sure, you are saving a little time, but who does everything right on the first try? ESPECIALLY when you are trying to create something absolutely new and original!? Swatching provides the essential information needed to plan a design. It gives you the information necessary to calculate how many stitches you’ll need for your finished dimensions and how much yardage you’ll need to make the full sized project. It confirms whether or not you’re happy with the density, drape, and overall look and feel of how your design behaves. It also confirms things like whether you’re happy with the color combination you picked out.
The Fix
Don’t skip swatching! It’s a simple fix but hard to execute. It’s tempting to skip swatching due to the commonly held false belief that skipping a swatch will save you time. Instead replace that belief with the more accurate statement that swatching almost always saves more time than it takes. This can become a new mantra to repeat to yourself to help curb impulsivly starting without a proper plan.
Mistake #2
Not Including Shaping in The Swatch
Including shaping in your swatch gives you the opportunity to test any concepts on a small scale. You’ll be able to get a good idea of whether or not you’re shaping plan will work out and behave the way you intend it to. It also gives you the opportunity to ensure that your stitch pattern and shaping perform together the way you think they will such as whether pattern repeats line up or not. Your swatch will show most shaping problems right away allowing you to fix problem areas before your project gets too large. This will greatly reduce the amount of frogging necessary and potentially save you several hours of work.
The Fix
Think about the overall construction of your design and plan to include its shaping in your swatch. This could include any increases or decreases planned for shaping a shawl, shaping the yoke of a sweater, or shaping the crown of a hat.
Mistake #3
Making The Swatch Too Small
This is one of the main reasons a swatch will lie. Your finished design is probably not going to be a 4” square (the most commonly recommended swatch size) so it is likely to behave differently in its larger and heavier form, not to mention the minor changes in your gauge that come from the way you hold and work on a small piece of fabric versus a large one. Making a swatch that’s too small also makes it difficult to “see it all” depending on the stitch pattern, construction, and colors you choose. This is especially true for larger designs like sweaters, blankets, and large shawls. For example, I’m currently working on a shawl where my main stitch pattern is about 6 inches wide and 12” long. To minimize frogging I have to swatch the entire stitch pattern before I start trying to shape it into its full size.
The Fix
Make your swatch as large as necessary within reason. Ensure your swatch size will give you a good idea of how your full stitch pattern or color pattern will look and how gravity and wear will affect it. The larger your designs finished size, pattern repeat, or color repeat, the larger your swatch should be. A 4” square can be a starting point, but I definitely wouldn’t recommend making a swatch smaller than that.
Mistake #4
Making a Mistake in the Math
At some point, you made a typo in the math, used the wrong number, used the wrong formula, or are missing a step of the calculations necessary to create your design. Let’s say you did the math for the construction of a circular yoke sweater but you forgot to check that the rate of your increases lined up with the multiple of your stitch pattern. As you get halfway down the yoke you may realize that things aren’t lining up and that you have to rip back several hours of work (ask me how I know…).
The Fix
You can double and triple check your math, ask a friend to look it over, or pay a tech editor to check it before you start.
Why I Don’t Hate Frogging As Much Anymore
It comes down to a change in behavior and a change in mindset. My mental attitude towards frogging has changed therefore my relationship with frogging has changed. Don’t get me wrong, I still don’t like frogging whatsoever, but I’ve made changes to my behavior and my mindset that make it easier for me to deal with the times that I do end up ripping out hours of work.
2 Coping Mechanisms for Frogging
#1 A Change in Mindset
Accept Frogging as Part of The Process
Whether you’d like to admit it or not frogging is a part of the designing process and the sooner you make peace with that, the easier it will become. The decision to frog a design almost always comes from a blatant mistake or disconnect between your expectations and reality as the design progresses. This is all part of the learning process! Think about it, you’re working on creating something that has never been made before. You can do your best to plan, and avoid the major mistakes discussed above, but sometimes that’s not going to be enough. You’re testing something that is not only most likely new to you but also hopefully new to everyone! It would be ludicrous if you got everything right all of the time on the first try with no mistakes. While you can take steps to minimize frogging it is not completely avoidable altogether. It’s best to both acknowledge and accept its part in the process.
#2A Change in Behavior
Calculate Your Time
Knowing how long it takes to create a design can be very helpful to put things into perspective. If you make a mistake at the end of your design and need to frog the entire thing, how much time will you lose exactly? Knowing these numbers upfront helps curb any impulsivity that’s urging you to rush through the swatching and planning process. It also helps when it comes to planning for deadlines. Take the time to swatch and plan your design. Use a spreadsheet to calculate how many total stitches are in your entire design. Once you’ve started making your sample set a timer for a few minutes. Working at a comfortable pace, see how many stitches you can complete before the timer goes off. The longer you time yourself the more accurate your predictions will be. For the ease of math, let’s say you timed yourself for a minute and you were able to create 20 stitches and you’re designing a blanket with a total of 20,000 stitches. 20,000 stitches / 20 stitches per minute = 1000 minutes worth of work to create the blanket which equals over 16 and a half hours. Knowing how much time you stand to lose makes it easier to slow down and plan properly and it also makes it easier to prepare for deadlines. Make sure you have enough days of padding to account for the possibility of having to frog more than half of the project.
I hope you found this post both informative and valuable. I hope this article will be able to save hundreds of designers thousands of hours.